
Symbol Values & Paytable Breakdown
Gems Bonanza Paytable: Symbol Payouts Explained
Every gem, every cluster band, every multiplier in Gems Bonanza laid out symbol by symbol.
- Theoretical RTP
- 96.51%
- Reels in play
- 8x8 grid
- Volatility level
- high
- Payline count
- Cluster pays
- Maximum win
- 10000x
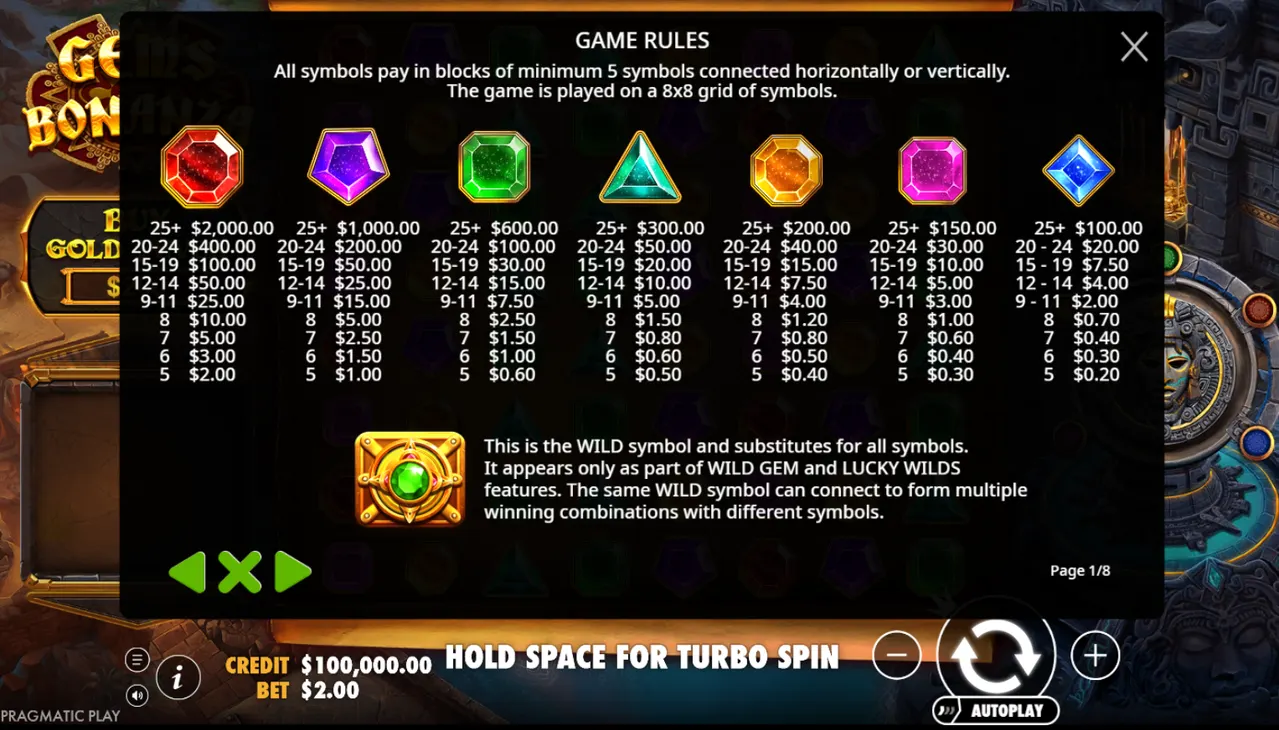
Gems Bonanza's paytable is built around seven gem symbols plus one wild. Clusters start at five connected gems and scale through six size bands up to 25-or-more. The two lowest gems, blue and pink, cap out at 50x and 75x stake respectively, while the five premium gems climb from roughly 100x up to 1,000x stake at 25+, with the deep red gem sitting as the single highest-paying symbol on the grid.
- Wilds only appear through bonus modifiers such as Wild Gem or Lucky Wilds, never on a raw base-game drop.
- There is no traditional scatter; coloured squares behind grid positions act as feature triggers instead of pay symbols.
- Only horizontal and vertical connections count toward a cluster — diagonals do not link symbols together.
How the Gem Paytable Works
The symbol set is entirely gemstones — no cards, no fruit, no character icons. Seven coloured stones form the paying roster: blue, pink, orange, cyan or aquamarine, green, purple, and red, ranked from lowest to highest value in that order. This narrow, thematic set keeps the visual field consistent but also means every symbol on the grid contributes to the same cluster-building logic, unlike slots that mix low cards with high-value icons.
Payouts follow six escalating bands: 5-6-7-8 symbols, 9-11, 12-14, 15-19, 20-24, and 25 or more. A cluster only needs to hit the minimum of five to pay, but the multiplier jump between the lowest and highest bands is steep. Blue gem, the weakest symbol, moves from roughly 0.10x stake at a five-symbol cluster to 50x at 25-plus. Red gem, the strongest, moves from around 1.00x up to 1,000x across the same bands — a spread that says a lot about how volatility is engineered into the paytable itself rather than just the bonus features.
There's a clear split between the two low-tier gems (blue and pink, capping at 50x and 75x) and the five premium gems (orange through red), which all reach into triple-digit or four-digit territory at 25-plus symbols. Purple and red in particular carry the bulk of the game's headline potential, and landing large clusters of either is what typically drives the biggest single-spin results.
The wild is visually distinct from the regular gems — a golden vault or square with an emerald centre — and it substitutes for any paying symbol to help complete or extend a cluster. Crucially, it isn't part of the standard reel drop. Wilds only enter the grid via specific modifiers, so a base spin without a triggered feature is played entirely with the seven gem symbols and no substitution help.
Instead of a scatter, the grid carries hidden coloured markings behind certain positions. These don't carry a payout value of their own; they function as qualifiers that, once covered by a winning cluster, trigger one of five spin modifiers (Nuclear, Wild Gem, Squares, Colossal Symbol, or Lucky Wilds). Reading the paytable in isolation only tells half the story — the marked positions determine how often those modifiers, and by extension the wild symbol, actually appear during play.
Some third-party listings describe Gems Bonanza as running on paylines, but the mechanic is cluster pays on an 8x8 grid — there is no fixed line structure, and understanding the paytable requires thinking in terms of connected blocks rather than left-to-right lines.
RTP Behind These Symbol Values
96.51%
Reported RTP for Gems Bonanza sits across a small set of verified configurations rather than one fixed figure, since operators can select between them; the paytable multipliers described above apply regardless of which configuration is live at a given casino.
Release Timeline
Narrow release date recorded for Gems Bonanza by Pragmatic Play.
Wide release date noted by some slot databases for broader casino availability.
How to Read the Gems Bonanza Paytable
Open the in-game paytable icon to view the full symbol list.
Identify the seven gem colours and their fixed low-to-high ranking.
Note the six cluster-size bands: 5-6-7-8, 9-11, 12-14, 15-19, 20-24, and 25+.
Check the multiplier for your symbol of interest at each cluster band.
Locate the wild's substitution rule and the modifiers that introduce it.
Compare premium gem multipliers against the two low-tier gems before setting a stake.
Paytable Questions
What's the lowest-paying gem in Gems Bonanza?
The blue gem, sometimes described as a blue diamond, sits at the bottom of the paytable and tops out at around 50x stake for a 25-plus cluster.
Does the wild symbol appear on regular base spins?
No. The wild only enters the grid through modifiers such as Wild Gem or Lucky Wilds — a base spin without a triggered modifier uses only the seven gem symbols.
How many matching gems are needed before a cluster pays?
A minimum of five connected gems, linked horizontally or vertically, is required to trigger a payout; diagonal placements don't count.
How different are purple and red gem payouts at maximum cluster size?
Purple reaches roughly 500x stake at 25-plus symbols, while red, the top symbol, reaches around 1,000x — the largest single-symbol payout on the grid.
Do the coloured squares on the grid pay out directly?
No. Those markings carry no payout value themselves; they act as triggers that activate one of five spin modifiers once a winning cluster covers them.
Why do some paytable summaries mention paylines for Gems Bonanza?
Some third-party listings default to payline language out of habit, but the game runs on cluster pays across an 8x8 grid with no fixed line structure.